BenchSci’s flagship product is AI-Assisted Reagent Selection, a web application that allows scientists to search the body of knowledge concerning various types of reagents and model systems (i.e. the ingredients used in their pharmaceutical experiments). The first version of this application was written in 2015 and, like most pieces of software, has gone through various iterations by various developers over the years. This app in particular was a JavaScript Web Application that was built at a time when React was relatively new and TypeScript was just gaining popularity. To give you an idea of what we were dealing with, here were some of the major features:
- Vanilla JavaScript: No TypeScript but some use of PropTypes
- Vanilla React built via Webpack: This was before the days of CreateReactApp
- Heavy use of Redux: This was the main way to store global data in the beginning
- Lots of Redux Sagas: And sagas inside sagas, because they were really popular back in 2015
- One giant application bundle: Code-splitting was something that had to be done manually back in “the old days” and since it was not trivial, it was challenging to prioritize
 BenchSci’s Reagent Selection web app
Regardless of its slightly older, convoluted software, the app has served the scientists using BenchSci well. Regular updates are deployed to over 50,000 users from 16 of the top 20 pharmaceutical companies who routinely log in to search and select reagent and model system products that will work best for them. Yet, our company’s goal is to bring novel medicines to patients 50% faster, so we are building new applications to further aid scientists in their quest.
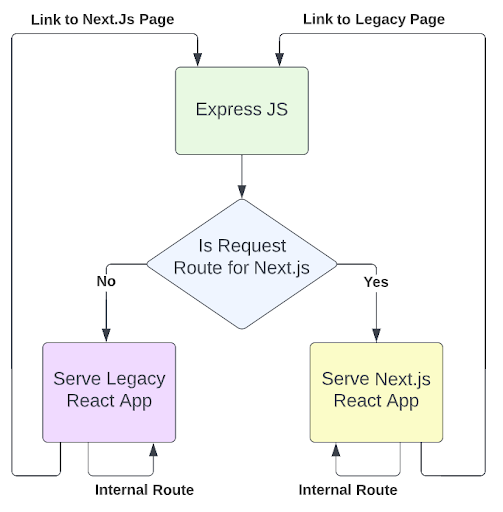
When we began developing new apps, we had a new crop of developers with new ideas and a more modern arsenal of technology to draw from, like Next.js and TypeScript. This left us with two very different frontend applications: our legacy Reagent Selection app and our shiny new Next.js-supported one. Users would unknowingly flip back and forth between the two apps as they needed. The experience was seamless because we used a custom Express server to determine which application bundle was served to the user, based on the URL of their initial request. Links buried inside one React app were clever enough to know when to reach out and boot up the other application if the user navigated from one app to the other. Still, a loading screen was sometimes seen between link clicks as each application needed time to boot up.
 Network routing for the Express server to select which app bundle to load
That’s why toward the end of 2021 we decided it was time to update our legacy app to make use of the latest breakthroughs in the JavaScript ecosystem. We sought to combine our old and new applications into one platform. Namely, we were drawn to these upgrades:
- Next.js: At the time of writing, it’s the most mature React Framework. It provides code-splitting out of the box and makes organizing your folder structure easier with its folder-based routing mechanism.
- TypeScript: Our legacy application sometimes produced surprising JavaScript errors that were hard to trace but were often a symptom of trying to plug a “circle into a square” as various JSON objects moved around. Having a solid typing system in place resolves this issue. We also know from experience that a typing system really solidifies your data flow so human mistakes are less likely to occur. TypeScript was the solution we chose to reduce our errors and release with more confidence.
- A better user experience: Nobody loves a loading screen, even if it’s a short one. Plus, there’s no reason to download a large JavaScript bundle for a single web page. By moving to Next.js, we could reduce our loading screens by 50%, make pages load faster by reducing the JavaScript sent over the wire, and offer users a faster overall experience.
- Modern React Design Patterns: Our new app uses React Query to manage its network calls. Our legacy app used a rather convoluted set of Redux Sagas that grew increasingly difficult to justify. Plus, sagas are one of the most complex ways to do React, and newer developers would become confused by all the generator functions. We were keen to get rid of them and move to React Query.
And so at the start of 2022, we began the great move of our flagship JavaScript application over to Next.js and TypeScript.
One Big Trip or Many Small Trips: How to Move the Code
Any developer at BenchSci will tell you that the impact your changes make to the end-user is paramount. To that effect, we pondered whether we should repeat taking one vertical slice of the Reagent Selection app and moving it over to Next.js, or should we move the entire application over in one giant move? The former would give our users a taste of the new world sooner but it also posed some risks.
Our old JavaScript application was complex. It had years of Redux Sagas built into it, most of which call other Redux Sagas and Selectors, making the code quite tangled and hard to reason about. It is challenging to pull a single page out of the application, taking all its sagas and selectors with it, without affecting some of the pages left behind.
In addition, we still had two frontend teams that were actively working on features for the legacy JavaScript application. If we pulled out a single page at a time, they might be left with feature plans that straddle two different applications. Even worse, our users would likely experience application loading screens in the middle of their workflows if some of their pages had been migrated while others had not.
Given these truths, we elected to first migrate all our legacy JavaScript code into the Next.js application in one move, then update it to TypeScript and functional components. In the process, we would remove the Redux Sagas and Selectors in favor of a leaner store that made use of the React Query library for its API calls. This would give us the advantage of all our developers working in the same codebase, so we could leverage their efforts in helping with the migration. It would also remove any “Frankenstein” experience for our users—no one would have to straddle their workflows across two application loads and the experience would be smoother overall.
 Before moving to Next.js we had to pack the boxes – in this case prepping the code
Packing the Boxes: Prepping for the Move
Before making the big move, we had to prepare both the old code for its trip and the new destination framework for its impending new occupant. Our goal in this first step was to make as few changes to the JavaScript codebase as possible. Any changes that needed to be made were hopefully done in our main code branch and deployed to Production before the move began.
But some of the changes we needed to make to the old codebase only made sense once it was living inside the Next.js framework. So we began to make lists of what those would be, including:
- Changing the Redux Selectors: There was a small Redux Store in our Next.js application and a giant one in our JavaScript application. In both, we stored a set of feature flags from our LaunchDarkly service, but we stored them under different keys in both applications. The way we import from LaunchDarkly to Redux in Next.js is so much cleaner so we decided that’s our future. We had to update the Redux Selectors in our JavaScript application so they could find the feature flags inside the new store. A simple global search-and-replace found our old keys, so we just had to update them to use the new keys.
- Getting rid of the Express server: We used an Express server to decide which application to serve (based on the incoming request’s URL) in our old ecosystem. We didn’t need it in our new system as everything was part of a single Next.js app. So we planned to delete it and rely solely on Next.js’s default method of serving an app.
- Swapping the Runtime Configuration: Our main application’s runtime configuration in our old application was done via a dynamic JSON file that was requested during the boot-up phase. It contained valuable information about the environment in which the application was running inside (such as the app’s root domain, the domain for the API server, etc). Next.js’s solution to this problem is to create an object called publicRuntimeConfig that is instantiated upon the deployment of the application to a server. There was no longer a need for the application to request more configuration after it boots up since it’s now dynamically loaded into the initial Next.js app bundle itself.
- Putting in new <Image />s: Next.js offers an <Image /> component that yields a few extra features (such as lazy loading). We wanted to make use of this instead of our old application’s standard <img /> tags. We used a global search-and-replace strategy to find all our old tags and replace them with the newer <Image /> tags. The one caveat is that Next.js’s image system wants to know the dimensions of your image to prevent content layout shift during app boot-up. We were able to provide that but not without some painstaking manual measuring of certain images.
- Fixing broken <Link />s: Next.js offers an improved <Link /> component that works with the internal Next.js routing system. We had to update our legacy links to make use of this newer system. One of its oddities is that a Next.js <Link /> contains an <a /> tag as its child. This seems strange since HTML rules don’t allow links inside links. It turns out that Next.js resolves this conundrum by rendering only one link in the final HTML. The main link information is a series of props passed to <Link /> while the inner <a /> tag is mostly for styling. We find this is one aspect of Next.js that could use some improvement.
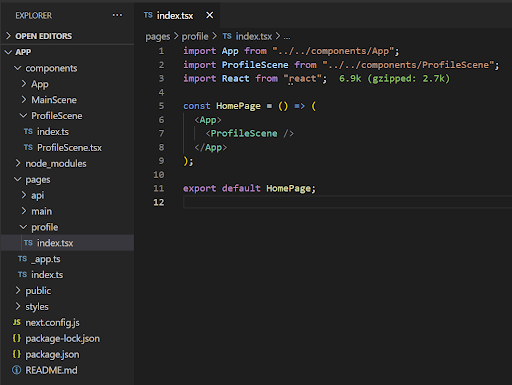
- Setting the <Scene />: Routing is very different between our old application and Next.js. In our JavaScript app, we used the classic React Router (and React Router Dom), but Next.js has its own folder-based routing system. Inside a special /pages folder, you are meant to create files and subfolders and cleverly map to a URL in your application. We had to manually remove our root React Router component and translate all of its routes into the correct files and folders under this /pages folder. One point of interest here is that our /pages folder doesn’t contain any presentational logic about a given page. Its files (which are meant to represent a single page) merely render a <Scene /> component (found in our /components folder) that constitutes a page. We like this pattern, as all routing logic is in the /pages folder but any presentational or business logic is in our main /components folder.
 The components in our Next.js pages folder only render Scenes to separate routing logic from
application logic - Navigating tricky routes: On the topic of routing, we had one particularly tricky route involving a FigureId as part of the URL that rendered an academic figure inside a modal, with some search results obfuscated behind it. In our old application, users would perform a search and click on a newly found figure, thus updating the URL. They could simply go back to their search results by closing the modal. We pointed out a design flaw when our seemingly RESTful URL was loaded from scratch. There was no way of knowing the search results, so our happy figure modal renders on top of an empty set of results. In RESTful thinking, the URL path is meant to indicate the resource being fetched but with figures as modals—the modality means the figure is more of an afterthought or attribute of the actual resource being fetched. Furthermore, these figure modals tend to pop up in lots of places in our app. Knowing this, we elected to move the FigureId into a query-string parameter, indicating it can appear on any URL path and could render a figure modal on top of any page’s content. Eventually, search result URLs would contain a results token in the path, in addition to a FigureId query-string parameter so the user could recall the correct state when doing a hard reload of a page.
- Wrangling the yamls: Lastly, all our cypress end-to-end tests for our legacy application were triggered to run when a pull request was initiated on its codebase. We had to update our Google Cloud GKE yaml files to trigger these tests whenever our Next.js application was updated.
Some of our new developers, who worked on the Next.js application, raised concerns that we were going to add unoptimized JavaScript code to their clean TypeScript ecosystem. The Next.js project had stricter ES Linting rules and despite trying to auto-fix our old code base with new ES Linting rules, there were too many places where the auto-fix couldn’t help us. We also knew that the moving of code was simply Phase 1 of our project. After we had merged the applications, we would begin migrating JavaScript to TypeScript.
To help us measure our efforts here and separate the inferior JavaScript code from the pristine TypeScript code, we elected to move our entire old application into a rather obtuse folder inside Next.js: /src/reagent-legacy/src/. This ugly folder path (with its offending dash and double mention of “src”) serves to remind us that this is just temporary housing for this code. It was also a folder designated as an exemption from the strict ES Lint rules of Next.js. Eventually, in Phase 2, the contents of this folder will be converted to TypeScript, properly ES Linted, and moved to its final resting place among our other components. We can measure our success in Phase 2 by reducing the number of files in this ugly folder to zero, after which we promised ourselves a party!
Moving Day
We practiced our move in a separate branch. We started by making bash scripts that did the move (and patched up the code) for us. We’d perform the move, run our tests, see what failed, and strategize how to best fix things. Then we’d go back to patching things up in the main branch and redo our scripted move. Eventually, once we had made all the changes to the main branch that we could, we realized we’d need a long-running git branch to contain our moved app and all our Next.js updates until all our tests were passing.
As we still had developers both in Next.js and the legacy JavaScript application adding and editing features, we had to incorporate their changes into our long-running merge branch. But how would we know about changes in a legacy application if we had moved those files over to Next.js in our application? The life-saving command here was “git mv.” Instead of naively copy-pasting code from our legacy application into our Next.js, we used “git mv” to bring the code over. This allows git to know that changes in a file in one location are meant to be changes applied to a file in a different location. But there’s an important “gotcha” when using this tool. You cannot make any changes to the code in the commit that does the “git mv” operation. It’s imperative that git labels your “git mv” as a file rename and not one file being deleted while another is added. The latter happens if you make changes to the code in the same commit. In the end, we squashed the commits in our long-running branch down to:
- Pre-move changes to the codebase
- The actual move via “git mv”
- Post-move changes to the codebase
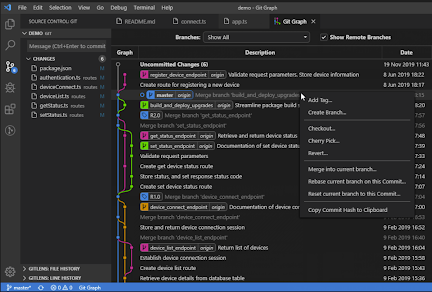
To keep our long-running branch up-to-date with our main branch, we would rebase it off our main branch, thus incorporating any changes that our other developers had made to either application. We aimed to do this every day, but often neglected this step, making each rebase more difficult as the change logs grew larger. Rebases would often contain conflicts, thankfully mostly in ES6 import statements pointing to the old folder structure. If there were any logical conflicts, we almost always chose the changes from the main branch as our goal was to not create logical changes in our migration efforts. We used the Git Graph plugin inside VS Code to help ease the burden of rebasing and to visualize where each branch was in our source control ecosystem.
 Git Graph was a valuable tool for us to visualize rebases
Eventually, we arrived at a point where all the tests in our long-running branch were passing, and our manual QA efforts found no bugs. The week before our official move day, we held an informal meeting to work through any concerns our developers might have after the move. We knew that the open work branches (those that had not yet been merged back into our main branch) would be confused about the state of the world after the move. We found that the easiest solution was to start a new branch once the merge had happened and “git cherry-pick” changes from an old working branch to a new branch. Our team preferred this over attempting to rebase a working branch on top of the newly merged app.
On the day of our move, we only did a code freeze for about an hour, the length of time it took us to merge our long-running branch into our main branch and do a sanity check on our QA server to see our application running under a single framework.

After a successful move, we’re settling into our new Next.js digs
The New Digs
Today we have everything under the banner of Next.js. Although our users cannot visually tell the difference, they’re no longer downloading a giant app bundle and instead are consuming only the code they need to complete their task. After running some tests, we discovered that our time-to-interactive metric, a measure of the app’s load time, has gone from over seven seconds to four seconds—a 41.6% improvement in our app’s loading speed. Our codebase still has lots of old JavaScript in it, but it’s sectioned off and our legacy frontend teams are excited to begin the job of converting their old components into a fresh set that is ready for the modern TypeScript landscape. We’re excited to migrate to React Query, to lose the complexity of Redux Saga, and gain all that Next.js has to offer.
It’s going to be a bold and wonderful new world for BenchSci’s engineers. We’re not at the completion of our journey but we can see the light at the end of the tunnel and we’re excited to reap its rewards!
—
We’re hiring! If you’re interested in building a great career in engineering, check out our Careers page. And subscribe to our blog to stay up to date with all things BenchSci.